Practical Guide to Injury Recovery: Ankle Sprain
Injuries to the ankle are typically the most challenging. An ankle sprain usually takes between 2 weeks to 2 months to heal. A physical therapist will examine you thoroughly to assess if the injury affects other body parts. Additional tests may be necessary to determine if other parts of your foot are injured.

Ankle sprains recover more quickly with physical therapy than they would without treatment. Recovery time varies based on your unique circumstances. A recovery program will be developed to meet your needs and goals to:
-
Reduce the pain
-
Regain muscle strength, motion, and balance
-
Return to normal activity levels
-
And avoid re-injury
The first 24 hours are the most critical time to treat the injury. Typically you may experience intense pain, swelling, throbbing, stiffness and weakness. Due to the ankle instability you may not be able to stand or walk on the affected foot.
Rest and elevate the ankle and avoid any activity that causes pain. Apply ice packs to the area. Be sure, consult with a physician to ascertain the severity of the injury.
Depending on how badly the ankle is damaged, the sprain will be classified as:
-
Grade 1 (mild). The ligament is overstretched.
-
Grade 2 (moderate). The ligament is overstretched or partially torn.
-
Grade 3 (severe). The ligament is completely torn.
The risk of re-injuring your ankle is likely. To help reduce the risk, it is important to strengthen and stretch your ankle after injury. Your physical therapist can create an ankle rehabilitation program to restore full pain free range of motion to the joint, strengthen the surrounding muscles to get you back to your normal physical routine.
Based on the physical therapist’s examination of your ankle, your goals, and on your activity level and general health an exercise treatment program will be developed integrating:
Range-of-motion exercises. Swelling and pain can result in limited mobility of the ankle. A physical therapist teaches you how to do safe and effective exercises to restore full movement to your ankle.
Muscle-strengthening exercises. Your physical therapist can determine which strengthening exercises are right for you based on the severity of your injury and where you are in your recovery.
Body awareness and balance training. When you are able to put full weight on your foot without pain, specialized training exercises help your muscles “learn” to respond to changes in your environment, such as uneven or unstable surfaces.
Functional training. When you can walk freely without pain, your treatment program may include activities that you were doing before your injury, such as walking, jogging, or modified running.
Activity-specific training. Depending on the requirements of your job or the type of sports you play, you might need additional rehabilitation.
Surgery is not commonly required for ankle sprains. If surgery is necessary, your physical therapist will help you minimize pain, regain motion and strength, and return to normal activities.
__________________________________________________________
These exercise treatments will allow you to be as active as possible with the least amount of pain, and will help speed healing.

Sit on a table or your bed and allow your injured ankle and foot to hang off the bed. Slowly flex and extend your ankle, and then rotate your foot inward (inversion) and outward (eversion). Finally, rotate your ankle clockwise and counterclockwise. If you exceed the 1-3 pain level, then back off your range of motion.
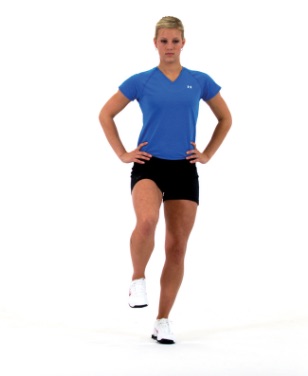
Balance on the foot of your injured ankle with a slightly bent knee. Focus your eyes on one spot to improve your balance. To increase the difficulty, close your eyes.
Sets / Reps: 2-3 x 30-60 sec. each leg (Do this on your non-injured leg as well.)
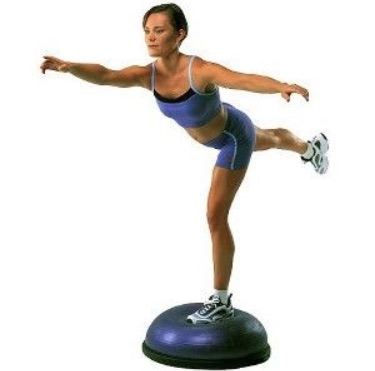
This is the exact same thing as Step 2, but on an unstable surface such as a few towels stacked on top of each other or a balance pad. Again, close your eyes to increase the difficulty.
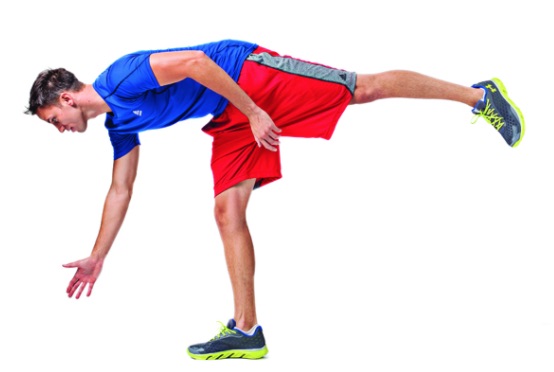
Balance on the foot of your injured ankle with a cone about a foot in front of you. Bend your hip and knee to squat down with your elevated leg extending behind you. Continue squatting down until you can touch the top of the cone with the hand opposite from your balancing leg. Stand up out of the squat and repeat.
Sets / Reps: 2-3 x 8-10 each leg
